Mass editing G-code
-
Hi!
I’m not a programmer, I use Notepad to edit my G-codes I send to my 3D printer, but I have a problem, that is easy to solve if you know what you are doing. (I guess)
So here it is: my code has a
;LAYER:72line before every layer. It is not a G or M code, the printer ignores it, it is just a note. However, I would like to replace them whit an M code like
M117 Layer:72/xx is the number of total layers, I give this number for every program, because I can see it in my slicer.
x can vary from 2 digits to 4What this does is it displays on the screen of my printer what layer it is printing currently.
Please give me a tutorial-like description, I don’t really know Notepad.
-
What you describe sounds best suited to a programming language. Using PythonScript or LuaScript, you can embed the code in the Notepad++ application, but it still is best handled by programming.
If
xwere the same for every file, you could easily set up a regular expression (FIND =^;LAYER:(\d+)$, REPLACE =M117 Layer:$1/x, MODE =regular expression, and Replace All in All Opened Documents, or switch over to Find In Files tab, and use Replace in Files after defining the file mask).If you just have a handful of files with a different
xper file, you could just do that once per file, using Replace All instead of the all-documents button.If you have many files, that becomes unwieldy, at which point probably a PythonScript or LuaScript (or any programming language you want, if you don’t need it to have access to the contents of your Notepad++ editor window(s)), where it would be an algorithm of “populate an array or hash/map structure which will map filename to X value; for each file { x = map(file); search-and-replace using those regexes, with the appropriate X value }”
- PythonScript project and download page
- PythonScript Install Instructions for recent Notepad++ versions
- LuaScript project and download page
- I believe you can install LuaScript directly from Plugins > Plugins Admin without having to follow special directions.
If you are willing to put in some effort with muddling through a scripting language: give it a try, but if you need help, if you posted your attempt at the PythonScript or LuaScript code, and told us why it’s results didn’t match what you were hoping for, you’d probably get some good help here. If you just want us to write your code for you for free, good luck with that.
- PythonScript project and download page
-
@PeterJones said
Good luck with that
Okay, I got interested enough to write it. Assuming you can figure out which Notepad++ menu to use to decode this encoded text, you get a freebie: Go buy a lottery ticket.
MS4gSW5zdGFsbCBQeXRob25TY3JpcHQNCjIuICoqUGx1Z2lucyA+IFB5dGhvblNj
cmlwdCA+IE5ldyBTY3JpcHQqKiwgcG9wdWxhdGUgd2l0aCB0aGUgZm9sbG93aW5n
LCBhbmQgc2F2ZSBpdCBhcyBgMTgyOTctZ2NvZGUtbGF5ZXItbnVtYmVyaW5nLnB5
YDoNCg0KICAgICAgICAjIGVuY29kaW5nPXV0Zi04DQogICAgICAgICIiImluIHJl
c3BvbnNlIHRvIGh0dHBzOi8vbm90ZXBhZC1wbHVzLXBsdXMub3JnL2NvbW11bml0
eS90b3BpYy8xODI5Ny8iIiINCiAgICAgICAgZnJvbSBOcHAgaW1wb3J0ICoNCg0K
ICAgICAgICAjY29uc29sZS5zaG93KCkNCiAgICAgICAgI2NvbnNvbGUuY2xlYXIo
KQ0KDQogICAgICAgIGRlZiBmb3J1bV9wb3N0MTgyOTdfbWFpbigpOg0KICAgICAg
ICAgICAgIiIiDQoNCiAgICAgICAgICAgIGFzc3VtZXMgdGhlIG1hcCBmaWxlIGlu
IGluIHRoZSBhY3RpdmUgZWRpdG9yLCB3aXRoDQogICAgICAgICAgICAgICAgImZp
bGVuYW1lIiB4bnVtDQogICAgICAgICAgICBwYWlycyBvbiBlYWNoLCBsaWtlDQog
ICAgICAgICAgICAgICAgImdjb2RlMTAwLmciIDI3MTgNCiAgICAgICAgICAgICAg
ICAiZ2NvZGUxMDEuZyIgMzE0DQogICAgICAgICAgICAgICAgImdjb2RlMTAyLmci
IDE2DQoNCiAgICAgICAgICAgIEl0IHdpbGwgb3BlbiB0aGUgaW5kaXZpZHVhbCBm
aWxlcyBpbiB0aGUgb3RoZXIsIGRvIHRoZQ0KICAgICAgICAgICAgc2VhcmNoL3Jl
cGxhY2UsIGFuZCBzYXZlL2Nsb3NlLg0KDQogICAgICAgICAgICAiIiINCiAgICAg
ICAgICAgIG5MaW5lcyA9IGVkaXRvci5nZXRMaW5lQ291bnQoKQ0KICAgICAgICAg
ICAgbWFwQnVmSUQgPSBub3RlcGFkLmdldEN1cnJlbnRCdWZmZXJJRCgpDQogICAg
ICAgICAgICBtYXBWaWV3ID0gbm90ZXBhZC5nZXRDdXJyZW50VmlldygpDQogICAg
ICAgICAgICBtYXBJbmRleCA9IG5vdGVwYWQuZ2V0Q3VycmVudERvY0luZGV4KG1h
cFZpZXcpDQoNCiAgICAgICAgICAgIGZvciBsIGluIHJhbmdlKDAsbkxpbmVzKToN
CiAgICAgICAgICAgICAgICBub3RlcGFkLmFjdGl2YXRlSW5kZXgobWFwVmlldywg
bWFwSW5kZXgpDQoNCiAgICAgICAgICAgICAgICB0eHQgPSBlZGl0b3IxLmdldExp
bmUobCkucnN0cmlwKCkNCiAgICAgICAgICAgICAgICBpZiBsZW4odHh0KT09MDog
Y29udGludWUNCiAgICAgICAgICAgICAgICBmbmFtZSwgeGlkID0gdHh0LnNwbGl0
KCciICcpDQogICAgICAgICAgICAgICAgZm5hbWUgPSBmbmFtZVsxOl0NCiAgICAg
ICAgICAgICAgICAjY29uc29sZS53cml0ZSgiZm5hbWUgPSAne30nLCB4aWQgPSAn
e30nXG4iLmZvcm1hdChmbmFtZSwgeGlkKSkNCg0KICAgICAgICAgICAgICAgIHJl
dCA9IG5vdGVwYWQub3BlbihmbmFtZSkNCiAgICAgICAgICAgICAgICBub3RlcGFk
Lm1lbnVDb21tYW5kKE1FTlVDT01NQU5ELlZJRVdfR09UT19BTk9USEVSX1ZJRVcp
DQogICAgICAgICAgICAgICAgZWRpdG9yLnJlcmVwbGFjZSgNCiAgICAgICAgICAg
ICAgICAgICAgJ147TEFZRVI6KFxkKykkJywNCiAgICAgICAgICAgICAgICAgICAg
bGFtYmRhIG06ICdNMTE3IExheWVyOicgKyBzdHIobS5ncm91cCgxKSkgKyAnLycg
KyB4aWQNCiAgICAgICAgICAgICAgICApDQogICAgICAgICAgICAgICAgbm90ZXBh
ZC5zYXZlKCkNCiAgICAgICAgICAgICAgICBub3RlcGFkLmNsb3NlKCkNCg0KDQog
ICAgICAgIGlmIF9fbmFtZV9fID09ICdfX21haW5fXyc6IGZvcnVtX3Bvc3QxODI5
N19tYWluKCkNCg0KMy4gQ3JlYXRlIGEgZmlsZSB0aGF0IGxvb2tzIGxpa2UNCg0K
ICAgICAgICAiQzpcVXNlcnNcUEVURVJ+MS5KT05cQXBwRGF0YVxMb2NhbFxUZW1w
XGdjXGcwMDEuZ2NvZGUiIDk4MzgNCiAgICAgICAgIkM6XFVzZXJzXFBFVEVSfjEu
Sk9OXEFwcERhdGFcTG9jYWxcVGVtcFxnY1xnMDAyLmdjb2RlIiA1ODQyDQogICAg
ICAgICJDOlxVc2Vyc1xQRVRFUn4xLkpPTlxBcHBEYXRhXExvY2FsXFRlbXBcZ2Nc
ZzAwMy5nY29kZSIgOTc3DQogICAgICAgICJDOlxVc2Vyc1xQRVRFUn4xLkpPTlxB
cHBEYXRhXExvY2FsXFRlbXBcZ2NcZzAwNC5nY29kZSIgMTc0OQ0KICAgICAgICAi
QzpcVXNlcnNcUEVURVJ+MS5KT05cQXBwRGF0YVxMb2NhbFxUZW1wXGdjXGcwMDUu
Z2NvZGUiIDY0NzcNCiAgICAgICAgIkM6XFVzZXJzXFBFVEVSfjEuSk9OXEFwcERh
dGFcTG9jYWxcVGVtcFxnY1xnMDA2Lmdjb2RlIiAzMw0KICAgICAgICAiQzpcVXNl
cnNcUEVURVJ+MS5KT05cQXBwRGF0YVxMb2NhbFxUZW1wXGdjXGcwMDcuZ2NvZGUi
IDUxMjMNCiAgICAgICAgIkM6XFVzZXJzXFBFVEVSfjEuSk9OXEFwcERhdGFcTG9j
YWxcVGVtcFxnY1xnMDA4Lmdjb2RlIiA3Njc2DQogICAgICAgICJDOlxVc2Vyc1xQ
RVRFUn4xLkpPTlxBcHBEYXRhXExvY2FsXFRlbXBcZ2NcZzAwOS5nY29kZSIgNjQy
Ng0KICAgICAgICAiQzpcVXNlcnNcUEVURVJ+MS5KT05cQXBwRGF0YVxMb2NhbFxU
ZW1wXGdjXGcwMTAuZ2NvZGUiIDE1NzYNCg0KICAgIHdoZXJlIHRoZSB0aGUgZmls
ZW5hbWUgX211c3RfIGJlIGluIHF1b3RlcywgYW5kIHRoZSBYIHZhbHVlIGlzIG9u
ZSBzcGFjZSBhZnRlciB0aGUgZW5kLXF1b3RlLA0KICAgIGFuZCB0aGUgWCB2YWx1
ZSBfbXVzdF8gYmUgb25lIG9yIG1vcmUgZGlnaXRzLg0KDQogICAgU2F2ZSB0aGF0
IGZpbGUsIGFuZCBoYXZlIGl0IG9wZW4gYXMgeW91ciBhY3RpdmUgZmlsZSBpbiBO
b3RlcGFkKysNCg0KNC4gKipQbHVnaW5zID4gUHl0aG9uU2NyaXB0ID4gU2NyaXB0
cyA+IGAxODI5Ny1nY29kZS1sYXllci1udW1iZXJpbmcucHlgDQo1LiBTaXQgYmFj
ayBhbmQgZW5qb3kgdGhlIHJpZGUuDQo=
This worked for me with the example map file, and using a bunch of files that have one or more
;LAYER:##lines in them… If it doesn’t work for you, and you want help tweaking / debugging, you’ll have to show some effort. -
It might be difficult for someone that says this to “show some effort”.
I’m not a programmer,
and
Please give me a tutorial-like description, I don’t really know Notepad(++).
Not impossible, but, just sayin’…
-
Not impossible, but, just sayin’…
Indeed.
Looks like the OP was last here soon after my first post, and I doubt he’ll be back. For the his sake, I hope my regex suggestions were sufficient for getting something.
-
@PeterJones Hi, I really really appreciate your effort. I’m gonna try them out now (if I can find out how). I was last here last week because I was away for the weekend and was busy with school after.
-
Okay, so I managed to install PythonScript. In theory I created the script (made the file, copy pasted your script and saved as you said (18297-gcode-layer-numbering.py))
I created a new file wich contains the directions for the folder I have my gcode files in, saved. But when I start the script, nothing happens. Literally. I click on the 18297-gcode-layer-numbering script and nothing.
I would show some effort, but I really don’t know how this works. I follow your instructions, but for example I have no idea what the script contains.Thank you very much for this, i don’t know what’s wrong.
-
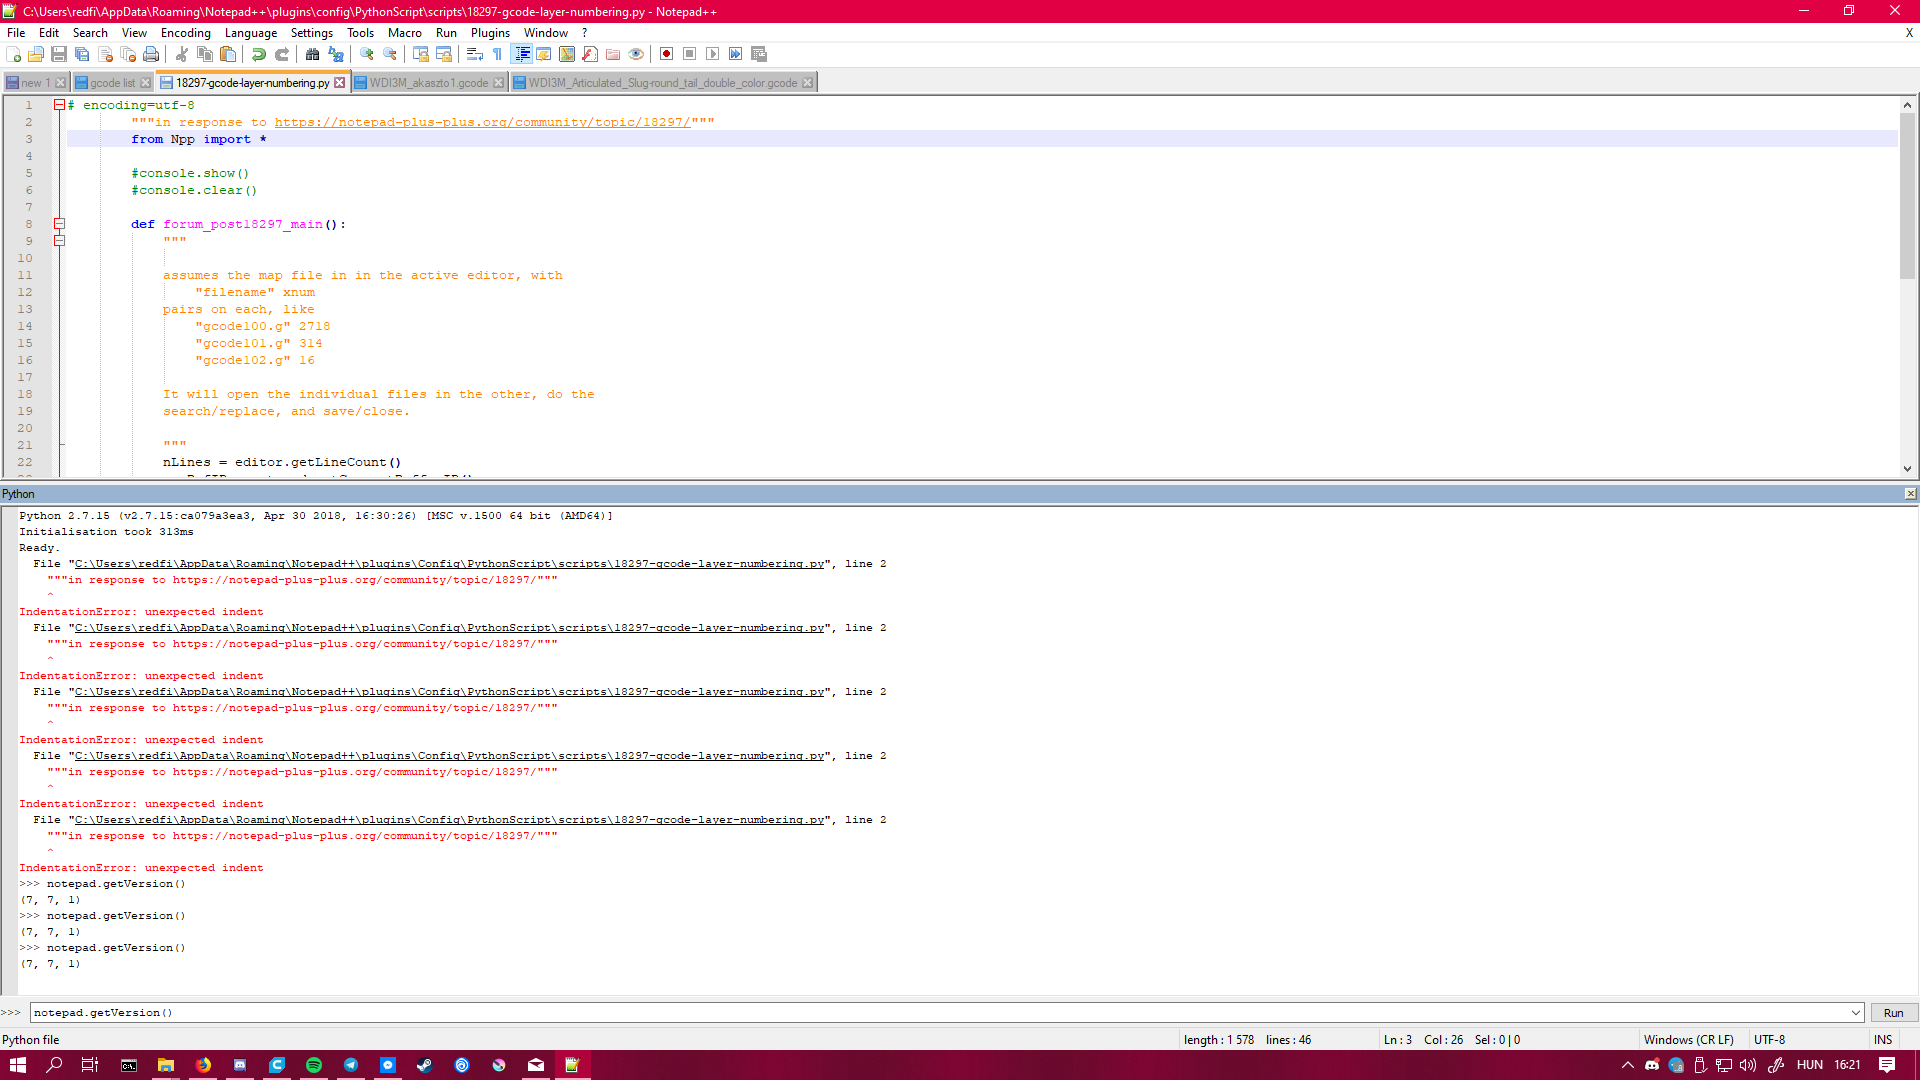
First let’s check if the plugin has been correctly installed.
Can you open the console?
Plugins->PythonScript->ShowConsole
If so, put the following into the run box in the console
notepad.getVersion()and press enter or click Run
What do you see? -
Thank you very much for this, i don’t know what’s wrong.
Welcome back.
Thanks for taking the effort to decode the script and install PythonScript; it shows you’re not just trying to get us to do your work for you.
First, start with @ekopalypse’s instructions, and tell us what you see.
After that, open your
18297-gcode-layer-numbering.py: if you go to Plugins > Python Script > Scripts, you can Ctrl+Click on18297-gcode-layer-numbering.pyto open it for editing.You’ll notice there are a few lines that start with
#console.– remove the#comment marker. Save.Open your map file like I showed, making sure you are using the paths to your actual files, and whatever ID you want for each file. It needs to be in the active/top editor window.
Then use Plugins > Python Script > Scripts, and normal-click on
18297-gcode-layer-numbering.pyto run the script. If the PythonScript console wasn’t showing before, it should now.
And you should seefilename = '...', xid = '...'for each file as it’s processing.If you see any red text in the PythonScript console window, you’ll have copy the whole console window, and paste the contents (especially the error) into your reply in the forum. Once you paste, hightlight that section you pasted and click the
</>to mark that section as code, so we get the actual characters you see. -
-
Sorry, I forgot that since you were decoding it, the forum wouldn’t gobble the indents.
In the script, Ctrl+A to select all, then Shift+TAB twice to un-indent twice. Save. Then go back to your map file and run the script again.
-
This post is deleted! -
@PeterJones said in Mass editing G-code:
then go back to your map file
You’ll also want to make sure your map file isn’t indented. Again, select all and Shift+TAB until it’s no longer indented.
-

Thank thanks thanks guys. I’ll test it on my printer soon, it is printing atm.
I really appreciate it! -
@PeterJones well I have good and bad news. The good is, your script works flawless, but turns out the gcode needs that line. Can you help me edit the script to insert the
M117 LayerX/sumXline AFTER the
;Layer:Xline?
-
Good news and bad news:
edit the script
Change the
lambda m:...line to:lambda m: str(m.group(0)) + "\r\nM117 Layer:" + str(m.group(1)) + '/' + xidThe
m.group(0)contains the whole original match. The\r\nadd a windows CRLF newline between the original match and the new text. The rest is the same as before. -
Now it works like a charm. Thank you again!
Hello! It looks like you're interested in this conversation, but you don't have an account yet.
Getting fed up of having to scroll through the same posts each visit? When you register for an account, you'll always come back to exactly where you were before, and choose to be notified of new replies (either via email, or push notification). You'll also be able to save bookmarks and upvote posts to show your appreciation to other community members.
With your input, this post could be even better 💗
Register Login