To add the button "Save as..." in the toolbar
-
Hello everybody,
When I want to add the function Save as… in the toolbar using the plugin CustomizeToolbar I can’t find the button “Save as” in the list at the left among the available buttons.
That’s curious.
Has it been missed, or is it me who miss something ?
Cheers,
Jacques -
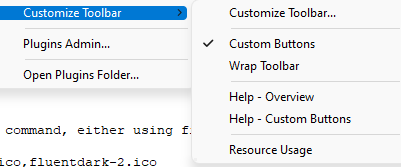
If you turn on Plugins > Customize Toolbar > Custom Buttons

(and restart if it wasn’t already on), then you can open%AppData%\Notepad++\Plugins\Config\CustomizeToolbar.btnOpening that file will show you examples (and there is a bit more documentation in the Plugins > Customize Toolbar > Help - Custom Buttons) of how to configure it to make buttons for anything in the menus of Notepad++.
One of the example entries is for Edit > Select All:
Edit,Select All,,,*R:SA,*R:SAThis uses the “quick codes” (described in the file, and in the help) to make a red “SA” on the toolbar.
I copied that, and used the name of Edit > Save As… (the three dots are critical):
File,Save As...,,,*G:SvA,*G:SvAAfter restarting, I now have two buttons made from text:

The RedSAbutton selects all. The GreenSvbutton does the Save As… (as you can see in the screenshot, the quick codes only display two characters per button)Instead of the two quick-codes, the docs show that you could point it to a .bmp file and two .ico files (all dimensioned 32x32): the BMP is if you use the old Settings > Preferences > General > Toolbar > Standard icons: small, and the two .ico files are for Fluent (light mode) and Filled Fluent (dark mode) icons. I just couldn’t supply you with example files that you would have immediately available (so I did the quick codes for easy proof-of-functionality instead), but it would be something like:
Edit,Select All...,,,standard-1.bmp,fluentlight-1.ico,fluentdark-1.ico… where the .bmp and two .ico files go in the same directory as
CustomizeToolbar.btn. -
@PeterJones
Hello Peter,Thanks a lot for your help.
Great ! Your procedure works !
I had troubles to reproduce it. I didn’t understand why it didn’t work the first times until I thought “Gosh ! The semicolons at the beginning of the lines are probably there to transform these lines to comments !”
Then I removed the semicolon which was the first character on the newly created line, and… Ha ha ! Won ! The button appeared ! And with its tooltip. And it works.
:)
Now it will be a piece of cake to modify the icon and put a small bitmap in its place using the last step of your explanation.
Thanks a lot again, Peter !
Cheers !
Jacques (from France)