How to create a C# plugin?
-
@Mark-Olson said in How to create a C# plugin?:
Notepad++ uses UTF-8 to encode its buffers
I don’t know C# or the C# interface, so this might not be relevant there, but in general, Notepad++ may work with Scintilla using UTF-8 or “ANSI” — ANSI being the system default Windows ANSI code page. SCI_GETCODEPAGE tells you which it is; in Notepad++ it is always either CP_ACP or CP_UTF8. (Defined, for example, here.)
I’m not sure how that translates to the C# functions you mentioned, but there are non-ASCII characters (128 of them, different ones for each code page) that can still be represented in ANSI mode. Like any ANSI character, they take up one position in Scintilla, not the number of positions the corresponding UTF-8 character would require.
-
@Coises said in How to create a C# plugin?:
I’m not sure how that translates to the C# functions you mentioned, but there are non-ASCII characters (128 of them, different ones for each code page) that can still be represented in ANSI mode.
See how my .NET Core template wraps all of Scintilla’s text manipulation APIs in a private method that takes account of the document’s encoding (which may be single-byte ASCII), converting to a properly encoded byte array before the window procedure call. (Note:
CodePageis the name of an interface property, which .NET Framework apparently supports, since the class library is multi-targeted.) -
I said:
I think you need to spend some time getting more familiar with the editor API, i.e., the Scintilla documentation (a portion of which was linked to earlier). It has everything you’ll need.
@PeterJones said:
While that is good advice, for someone just getting started, it’s knowing where to look in that rather big document, or the right search terms, that is the difficulty.
I said what I said because I was feeling like this topic was heading in the direction of potentially a lot of spoon-feeding. Everyone should spend time with the documentation when they’re using something new, and ask detailed questions when those questions are really needed.
-
Another possibility would be to use the internal search engine of Npp and thus avoid the encoding problem.
This means using SCI_SEARCHINTARGET with a corresponding regular expression in a loop and then SCI_GETTARGETSTART and SCI_GETTARGETEND to determine the positions. SCI_GETTARGETEND then becomes the next start position for SCI_SEARCHINTARGET … -
@Ekopalypse : Let me start by thanking all of you for the wonderful support I’m getting from you guys.
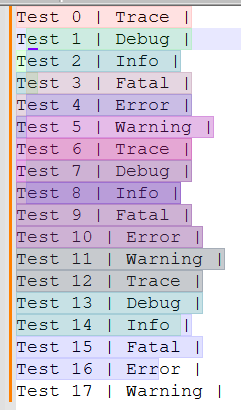
At this moment I’m at the stage that I’m having the following pieces of source code:
int iAmountOfLines = Npp.editor.GetLineCount();
for (int i = 0 ; i < iAmountOfLines; i++)
{
    string strCurrentLine = Npp.editor.GetLine(i);
    if (strCurrentLine.IndexOf(Txt_Trace) != -1)
    {
        Npp.editor.SetIndicatorCurrent(0); // Trace
        Npp.editor.IndicatorFillRange(Npp.editor.GetLineEndPosition(i) - strCurrentLine.Length, Npp.editor.GetLineEndPosition(i));
    }
The “if”-clause is being repeated for all log levels, and it is currently giving the following output (not correct, but very promising 😀):
When seeing that, you might wonder how I have configured the corresponding colours. Well, me too 😥. Let me show you what I mean: this is what I see when I open the corresponding configuration form:
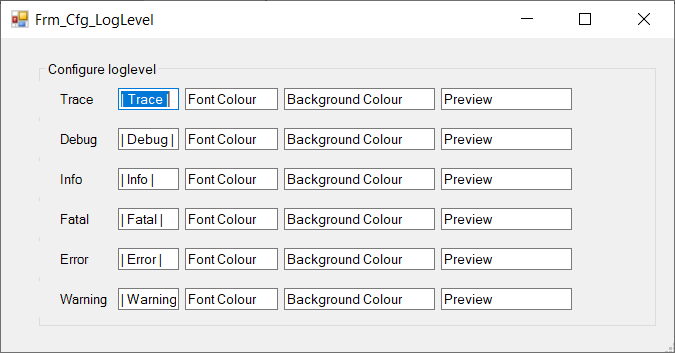
“But Dominique, you didn’t configure your colours?”
Well, I did, but I forgot two things:
- Using the already configured colours while re-opening the configuration form, I’ll take care of that.
- Saving the already configured colours in registry, in order to avoid needing to re-configure the whole thing every time I perform a test.
About that last part, I have the simple question: “Where?”.
For your information, this is what my registry looks like at “HKey_Local_Machine\SOFTWARE”:
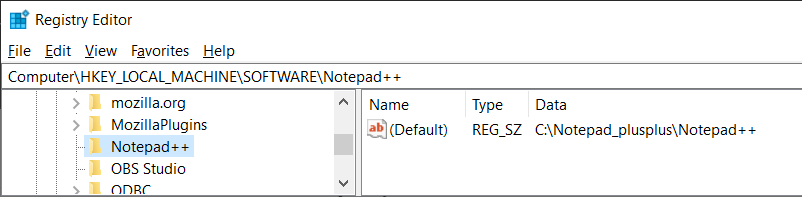
You might notice two things:
- There is another tool (Mozilla), having its plugins configured around that place.
- There are no Notepad++ plugins being configured around that place. (Although I have some Notepad++ plugins I’ve used before)
Can anybody confirm if I’m at the right spot for saving Notepad++ plugin configurations? If not, what’s a place which is better suited?
Thanks in advance (again)
-
Although the registry is actually the Windows standard, I would personally avoid it and rather use the plugin config directory. Can be determined via NPPM_GETPLUGINSCONFIGDIR.
However, I would create a subdirectory with the plugin name and add a json, xml, toml … file there. -
Good morning, guys.
Due to circumstances (I’m on holiday for supporting my sick mother), I don’t always have time to work on the plugin, hence my absence for some weeks.I have decided to save the corresponding configurations in the registry anyway, but I’m doing this on user level (HKCU instead of HKLM). As a result, I don’t need administrator privileges for running the plugin. That part is working fine now.
I’m now back to the colouring, and there some things are going wrong, I believe it’s due to the 2-character end-of-line, shifting the colours in a wrong way.
Let me show you the code I currently have:
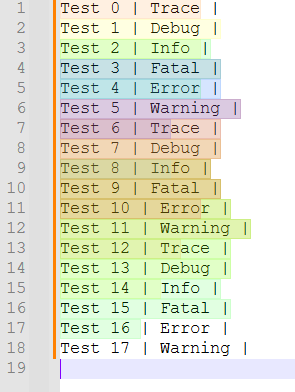
#region " Key texts "
public static string Txt_Trace     = "| Trace |";
public static string Txt_Debug     = "| Debug |";
...

// define EndOfLine character
public const string EndOfLine = "\r\n";

// Create a testfile
Npp.notepad.FileNew();
string text = $"{Txt_Trace}   : Test 00\r\n" +
              $"{Txt_Debug}   : Test 01\r\n" +
              $"{Txt_Info}    : Test 02\r\n"  +
              $"{Txt_Fatal}   : Test 03\r\n" +
              $"{Txt_Error}   : Test 04\r\n" +
              $"{Txt_Warning} : Test 05\r\n" +
              ...

// Perform the colouring
int iAmountOfLines = Npp.editor.GetLineCount();
for (int i = 0 ; i < iAmountOfLines; i++)
{
    string strCurrentLine = Npp.editor.GetLine(i);
    int iStartPosition, iLength;
    iStartPosition = Npp.editor.GetLineEndPosition(i) + EndOfLine.Length - strCurrentLine.Length;
    if (i != 0) iStartPosition++; // in order to replace 0-18,18-36,36-54 by 0-18,19-37,38-56
    iLength = Npp.editor.GetLineEndPosition(i) + EndOfLine.Length;

    if (strCurrentLine.IndexOf(Txt_Trace) != -1)   Npp.editor.SetIndicatorCurrent(0); // Trace
    if (strCurrentLine.IndexOf(Txt_Debug) != -1)   Npp.editor.SetIndicatorCurrent(1); // Debug
    if (strCurrentLine.IndexOf(Txt_Info) != -1)    Npp.editor.SetIndicatorCurrent(2); // Info
    if (strCurrentLine.IndexOf(Txt_Fatal) != -1)   Npp.editor.SetIndicatorCurrent(3); // Fatal
    if (strCurrentLine.IndexOf(Txt_Error) != -1)   Npp.editor.SetIndicatorCurrent(4); // Error
    if (strCurrentLine.IndexOf(Txt_Warning) != -1) Npp.editor.SetIndicatorCurrent(5); // Warning
    Npp.editor.IndicatorFillRange(iStartPosition, iLength);
}
Something is terribly wrong, as you can see in the following result:
I’ve already been experimenting a lot, but I never get it exactly right.
Does anybody have an idea?
Thanks in advance -
I’ve modified the
EndOfLinecharacter from"\r\n"into"\n"and it’s already a lot better:public const string EndOfLine = "\n";Result:
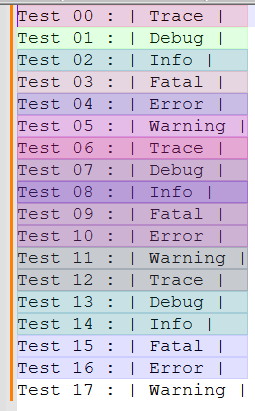
As you see, the colouring per line seems to be fine now.
So let’s head to the following subject: the colouring is ugly, as you can see from the following form: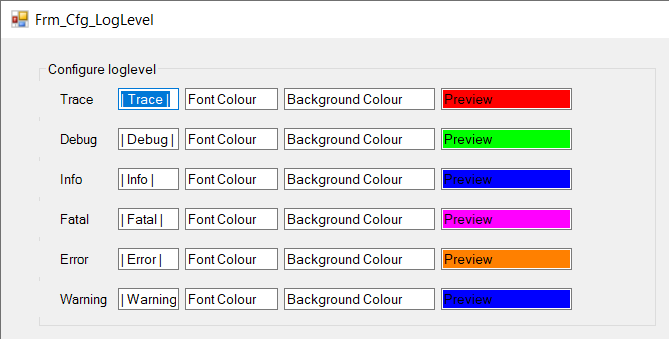
The “Trace” colour (being red) is not really red in the Notepad++ editor.
The “Debug” colour (being green) is not really green in the Notepad++ editor.
…Is there a way to make sure that the colours, as defined in the configuration form (and saved into registry) are well shown in the Notepad++ editor?
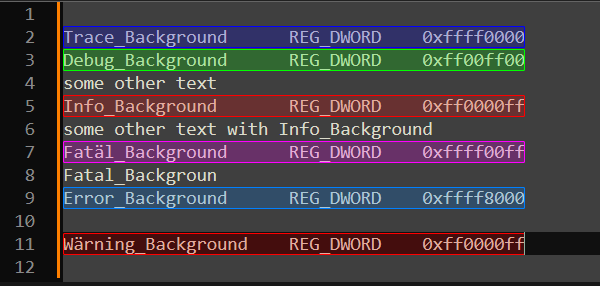
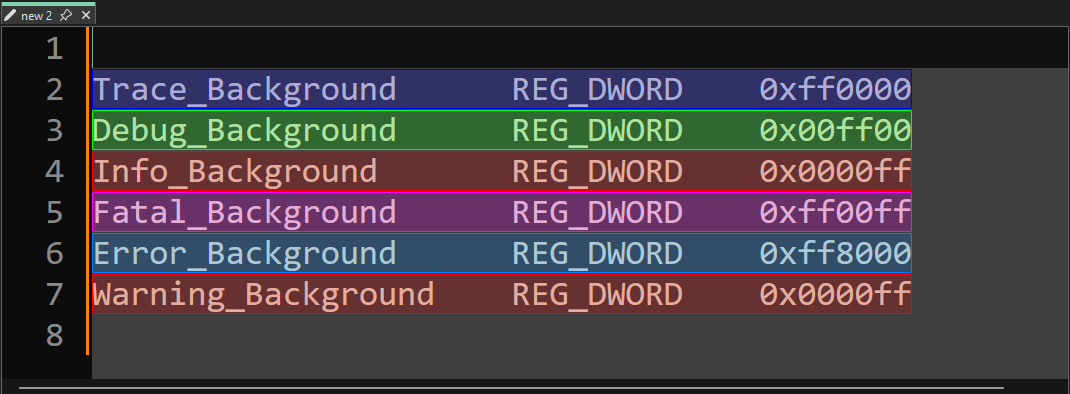
In case of doubt, hereby the values in the registry:
reg query "HKEY_CURRENT_USER\SOFTWARE\Notepad++Plugins\NLog_Integration" /S

HKEY_CURRENT_USER\SOFTWARE\Notepad++Plugins\NLog_Integration
    Trace_Background      REG_DWORD    0xffff0000
    Debug_Background      REG_DWORD    0xff00ff00
    Info_Background       REG_DWORD    0xff0000ff
    Fatal_Background      REG_DWORD    0xffff00ff
    Error_Background      REG_DWORD    0xffff8000
    Warning_Background    REG_DWORD    0xff0000ff
For your information: it’s not related to the style of the indicators, as they all have the same style (
FULLBOX), as you can see:Npp.editor.IndicSetStyle(..., IndicatorStyle.FULLBOX);Is there any “indicator configuration” which means something like “Show the colour of an indicator exactly as meant”? (I know it sounds silly, but you get the idea 😀)
Thanks in advance
-
@scampsd said in How to create a C# plugin?:
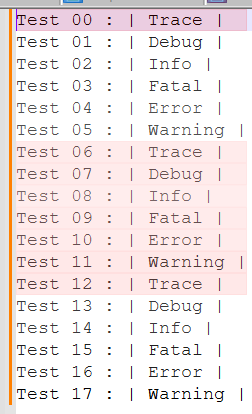
As you see, the colouring per line seems to be fine now.
I don’t think this is ok because, for example, the trace lines have different colors, which makes me suspect that you are somehow overlaying different colors.
Can you define just one color and see if that makes a difference? -
@Ekopalypse You’re right: I’ve disabled all configurations, except for the “Trace” one (I used the red colour for that one), and apparently the first “Trace” line is red and the lines between the second and third “Trace” line are some kind of “dimmed” red:
I honestly believe: either something is wrong with the indicator technology, either I’m using the indicator technology in a way it’s not supposed to (I already find it very strange I need to calculate positions of individual characters in order to highlight an entire line).
Does anybody have an idea?
Thanks -
@scampsd said in How to create a C# plugin?:
apparently the first “Trace” line is red and the lines between the second and third “Trace” line are some kind of “dimmed” red:
The first line is the line that has the caret. Notepad++ (and all scintilla-based editors) can highlight the “active line” differently than the others, and this does affect background colors of indicators or stylers.
something is wrong with the indicator technology
The “indicator” colors are applied with transparency. When Notepad++ uses indicators (for Smart Highlighting, Find Mark Style, and the style-a-token coloring – which use indicators under the hood), it seems to apply a transparency of about 60% (as described here ): with Notepad++'s usage, if you have a highlight of green RGB=[0,255,0], with a white RGB=[255,255,255] background, the actual color will be RGB=[155,255,155]
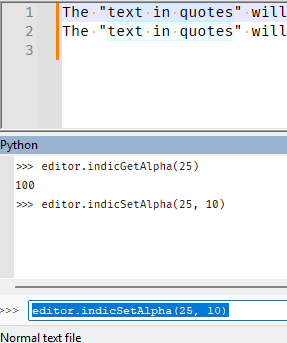
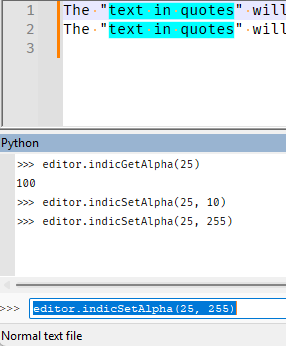
Ah, here it is: in Scintilla, there is the SCI_INDICSETALPHA/SCI_INDICGETALPHA to set/get the alpha (transparency) value for the given indicator. [The alpha value can range from 0 (completely transparent) to 255 (no transparency)].
If you don’t like the amount of transparency you are currently seeing, I’d try getting that value to see what the “default” is, and then setting it to something less transparent, to see if it’s more to your liking.
But understand: Scintilla itself, or Notpead++'s settings for other Scintilla colors, may be also applying colors with some transparency that will combine taking higher priority above your non-transparent indicators, and you might not be able to get around that. I think this might actually be the case, because from what I can find, Notepad++ is setting alpha to
255 [no transparency]for the indicators, but it’s effectively getting 60% transparency, so there is some other color merging going on under the hood, as far as I can tell.
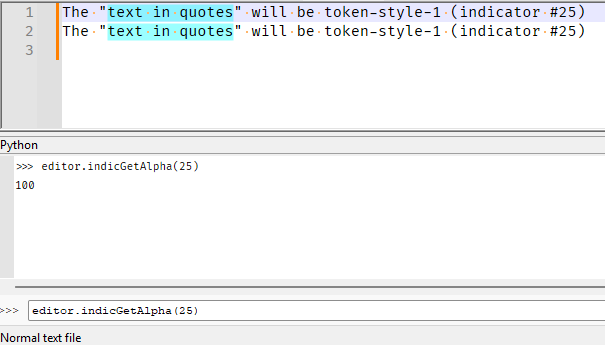
update 1: no, Notepad++ is setting the value to 100 – I was reading that as “100%”, but it’s actually 100 out of a possible 255 – which is 39% of 255: since the scale is backward (with 0 being fully transparent and 255 being non-transparent, that means 61%, which is definitely “approximately 60%”). When I ran
for i in range(44): console.write("indic#{:02d} => {}\n".format(i, editor.indicGetAlpha(i)))in PythonScript, it lists most indicators at about value=30/255 (which is mostly-transparent, about 90%).indic#00 => 30 indic#01 => 30 indic#02 => 30 indic#03 => 30 indic#04 => 30 indic#05 => 30 indic#06 => 30 indic#07 => 30 indic#08 => 70 indic#09 => 30 indic#10 => 30 indic#11 => 30 indic#12 => 30 indic#13 => 55 indic#14 => 30 indic#15 => 30 indic#16 => 30 indic#17 => 30 indic#18 => 30 indic#19 => 30 indic#20 => 30 indic#21 => 100 indic#22 => 100 indic#23 => 100 indic#24 => 100 indic#25 => 100 indic#26 => 100 indic#27 => 100 indic#28 => 100 indic#29 => 100 indic#30 => 30 indic#31 => 100 indic#32 => 30 indic#33 => 30 indic#34 => 30 indic#35 => 30 indic#36 => 30 indic#37 => 30 indic#38 => 30 indic#39 => 30 indic#40 => 30 indic#41 => 30 indic#42 => 30 indic#43 => 30(Those values are just what mine happen to be at: I’ve got a lot of plugins and other such things, so other than recognizing Notepad++'s value of “100” for its indicators, I don’t know for sure what’s setting #8 to 70 or #13 to 55)
update 2:
Default token#1 indicator (alpha=30):
Change to alpha=10:
And alpha=255:
In each of those images, the first line is the “active line” and the second is a non-active line, so you can see how active-line affects things.
-
@scampsd said in How to create a C# plugin?:
I honestly believe: either something is wrong with the indicator technology
:-D I honestly think it’s more likely to be your code. :-D
just a quick demo - not production ready !!
fn (e Editor) set_text() { text := c" Trace_Background REG_DWORD 0xff0000 Debug_Background REG_DWORD 0x00ff00 Info_Background REG_DWORD 0x0000ff Fatal_Background REG_DWORD 0xff00ff Error_Background REG_DWORD 0xff8000 Warning_Background REG_DWORD 0x0000ff " e.call(sci_settext, 0, isize(text)) } fn (e Editor) init_indicator() { for i in 15..21 { e.call(sci_indicsetstyle, usize(i), 7) match i { 15 { e.call(sci_indicsetfore, usize(i), 0xff0000) } 16 { e.call(sci_indicsetfore, usize(i), 0x00ff00) } 17 { e.call(sci_indicsetfore, usize(i), 0x0000ff) } 18 { e.call(sci_indicsetfore, usize(i), 0xff00ff) } 19 { e.call(sci_indicsetfore, usize(i), 0xff8000) } 20 { e.call(sci_indicsetfore, usize(i), 0x0000ff) } else {} } e.call(sci_indicsetalpha, usize(i), 55) e.call(sci_indicsetoutlinealpha, usize(i), 255) } } fn (e Editor) highlight_line(line int, indicator int) { start_pos := e.call(sci_positionfromline, usize(line), 0) length := e.call(sci_linelength, usize(line), 0) e.call(sci_setindicatorcurrent, usize(indicator), 0) e.call(sci_indicatorfillrange, usize(start_pos), isize(length)) } pub fn (e Editor) test() { e.init_indicator() e.set_text() line_count := e.call(sci_getlinecount, 0, 0) for i:=0; i<line_count; i++ { length := e.call(sci_linelength, usize(i), 0) buffer := vcalloc(length+1) e.call(sci_getline, usize(i), isize(buffer)) line_content := unsafe { cstring_to_vstring(buffer) } if line_content.starts_with('Trace') { e.highlight_line(i, 15) } else if line_content.starts_with('Debug') { e.highlight_line(i, 16) } else if line_content.starts_with('Info') { e.highlight_line(i, 17) } else if line_content.starts_with('Fatal') { e.highlight_line(i, 18) } else if line_content.starts_with('Error') { e.highlight_line(i, 19) } else if line_content.starts_with('Warning') { e.highlight_line(i, 20) } else { continue } } } -
Hello, @scampsd, @peterjones, @mark-olson, @ekopalypse, @coises, @alan-kilborn and All,
@scampsd, the post, below, is a small part of my
5successive posts about colors and the Notepad++ management of colors in styles, written inOctober 2019. Refer to :https://community.notepad-plus-plus.org/post/47895
or
https://community.notepad-plus-plus.org/topic/18157/how-to-set-find-background-colour/24
I do hope, @scampsd, that you’ll find some useful information in this post and in my older posts about this topic, too !
Here is a very simple algorithm for the calculus of the
RGBvalues of the colorCr, resulting of the mixing of a new colorCnwith the current colorCc:#--------------------- # Blend of TWO colors #--------------------- #----------------------------------------------------------------------------------------------------------------------------- # # RESULTING color Cr, from the blend of TWO colors, Cn and Cc, with an OPACITY factor alpha # # # IMPORTANT : This calculus can be used, EITHER, for the BLEND of : # # - the NEW color, Cn, with the current FOREGROUND color Cc ( a TEXT ) # # - the NEW color, Cn, with the current BACKGROUND color Cc # #----------------------------------------------------------------------------------------------------------------------------- # # Given a CURRENT color Cc with OPACITY factor = 1 and a NEW color Cn, ADDED, with an OPACITY factor alpha, # # in the [ 0 - 1 ] interval, and the RESULTING color Cr, with an OPACITY factor = 1 : # # # We apply the general formula : Cr = alpha * Cn + ( 1 - alpha ) * Cc # # which can be rewritten : Cr = Cc + alpha * ( Cn - Cc ) # # # If alpha = 1 then the RESULTING color Cr is the NEW color Cn ( => The NEW color Cn is totally OPAQUE ) # # If alpha = .5 then the RESULTING color Cr is the PERFECT mixing of the TWO colors Cn and Cc # # If alpha = 0 then the RESULTING color Cr is the CURRENT color Cc ( => The NEW color Cn is totally TRANSPARENT ) # #----------------------------------------------------------------------------------------------------------------------------- # --- Assumptions on opacity component alpha of the NEW color Cn ------------------------------------------------------------- # alpha in interval [ 0 - 255 ] # --- Normalization to interval [ 0 - 1 ] ------------------------------------------------------------------------------------ alpha = alpha / 255 # --- Assumptions on Red, Green and Blue components of the CURRENT color Cc -------------------------------------------------- # Rc in interval [ 0 - 255 ] Gc in interval [ 0 - 255 ] Bc in interval [ 0 - 255 ] # --- Assumptions on Red, Green and Blue components of the NEW color Cn ------------------------------------------------------ # Rn in interval [ 0 - 255 ] Gn in interval [ 0 - 255 ] Bn in interval [ 0 - 255 ] # --- Calculus of Red, Green and Blue components of the RESULTING color Cr --------------------------------------------------- Rr = Rc + alpha * ( Rn - Rc ) Gr = Gc + alpha * ( Gn - Gc ) Br = Bc + alpha * ( Bn - Bc ) # --- Results : Red [ 0 - 255 ] , Green [ 0 - 255 ] and Blue [ 0 - 255 ] components of the RESULTING color ------------------- PRINT Rr ; Gr ; Br # ----------------------------------------------------------------------------------------------------------------------------
At last, if we apply the above equations to Notepad++, we can explain most of the resulting colors, due to the different user, N++ or plugins highlightings ;-))
From tests, I noticed that all N++ background highlighting seem to use the value alpha =
100/255≈0,3922You’ll find some examples, below. Note that :
-
All the colors are described with the
RGBAcolor space :(Red, Green, Blue, Alpha) -
I assume the default N++ theme is used (
stylers.xml). This implies that current text color is Black(0,0,0,1)and current background color is White(255,255,255,1) -
I also assume that the option
Settings > Preferences... > Editing > Enable smooth fontis unticked -
The opaque current line and current selection styles are the default ones. So,
RGBAvalue of current line Bg and current selection Bg are, respectively,(232,232,255,1)and(192,192,192,1)
0,255,0,0.392   ( Smart Highlighting )         +  255,255,255,1 ( White Bg )              =>  Resulting color = 155,255,155,1
0,255,0,0.392   ( Smart Highlighting )         +  232,232,255,1 ( Current line Bg )       =>  Resulting color = 141,241,155,1
0,255,0,0.392   ( Smart Highlighting )         +  192,192,192,1 ( Current Selection Bg )  =>  Resulting color = 117,217,117,1

255,0,0,0.392   ( Find Mark Style )            +  255,255,255,1 ( White Bg )              =>  Resulting color = 255,155,155,1
255,0,0,0.392   ( Find Mark Style )            +  232,232,255,1 ( Current line Bg )       =>  Resulting color = 241,141,155,1
255,0,0,0.392   ( Find Mark Style )            +  192,192,192,1 ( Current Selection Bg )  =>  Resulting color = 217,117,117,1

255,128,0,0.392 ( Mark Style 2 )               +  255,255,255,1 ( White Bg )              =>  Resulting color = 255,205,155,1
255,128,0,0.392 ( Mark Style 2 )               +  232,232,255,1 ( Current line Bg )       =>  Resulting color = 241,191,155,1
255,128,0,0.392 ( Mark Style 2 )               +  192,192,192,1 ( Current Selection Bg )  =>  Resulting color = 217,167,117,1


128,0,255,0.392 ( Mark Style 4 )               +  255,255,255,1 ( White Bg )              =>  Resulting color = 205,155,255,1
128,0,255,0.392 ( Mark Style 4 )               +  232,232,255,1 ( Current line Bg )       =>  Resulting color = 191,141,255,1
128,0,255,0.392 ( Mark Style 4 )               +  192,192,192,1 ( Current Selection Bg )  =>  Resulting color = 167,117,217,1

0,128,255,0.392 ( Incremental Highlight All )  +  255,255,255,1 ( White Bg )              =>  Resulting color = 155,205,255,1
0,128,255,0.392 ( Incremental Highlight All )  +  232,232,255,1 ( Current line Bg )       =>  Resulting color = 141,191,255,1
0,128,255,0.392 ( Incremental Highlight All )  +  192,192,192,1 ( Current Selection Bg )  =>  Resulting color = 117,167,217,1

0,128,255,0.392 ( Tag match highlighting )     +  255,255,255,1 ( White Bg )              =>  Resulting color = 205,155,255,1
0,128,255,0.392 ( Tag match highlighting )     +  232,232,255,1 ( Current line Bg )       =>  Resulting color = 191,141,255,1
0,128,255,0.392 ( Tag match highlighting )     +  192,192,192,1 ( Current Selection Bg )  =>  Resulting color = 167,117,217,1

255,255,0,0.392 ( Tag Attribute )              +  232,232,255,1 ( Current line Bg )       =>  Resulting color = 241,241,155,1
255,255,0,0.392 ( Tag Attribute )              +  192,192,192,1 ( Current Selection Bg )  =>  Resulting color = 217,217,117,1
If we apply, both,
Mark Style 2andMark Style 4on Current Background, this operation is equivalent to :-
Firstly, apply the
Mark Style 4on Current Background -
Secondly, apply the
Mark style 2on the resulting color (Mark Style 4+ Current Background )
Note that the order is important : the style, of higher value, must be processed first. So,
Style 4thenStyle 2!Hence :
255,128,0,0.392 ( Mark Style 2 )  +  205,155,255,1 ( Mark Style 4  +  White Bg             )  =>  Resulting color = 225,144,155,1
255,128,0,0.392 ( Mark Style 2 )  +  191,141,255,1 ( Mark Style 4  +  Current Line Bg      )  =>  Resulting color = 216,136,155,1
255,128,0,0.392 ( Mark Style 2 )  +  167,117,217,1 ( Mark Style 4  +  Current Selection Bg )  =>  Resulting color = 202,121,132,1
Best Regards,
guy038
-
-
The difference in the hex values in your code compared to those that were in the registry values that @scampsd shared might be a hint: those registry values are showing 4-byte RGBA values (with the highest byte, the alpha, always being 0xFF (255)). I wonder if @scampsd was assuming that passing in an RGBA into the SCI_INDICSETFORE message would automatically set alpha value. (I just noticed the extra byte in the registry values after seeing your post with the 3byte RGB so emphasized in the screenshot.)
SCI_INDICSETFORE accept RGB colors, not RGBA. As is described for the
colourvscolouralphatypes listed in the intro of Scintilla docs, any message (including SCI_INDICSETFORE) that is expecting acolourargument need RGB, not RGBA. The only messages that accept RGBA are ones that are listed withcolouralpha.So if you have grabbed a four-byte RGBA out of the registry for your foreground color, you need to split it, using psuedo-code like:
rgba = read_from_registry(...) # example: 0xffff8000 rgb = rgba & 0x00FFFFFF # example: 0x00ff8000 alpha_value = (rgba >> 24) & 0xFF # example: 0xff SCI_INDICSETFORE(indicatorIndex, rgb) SCI_INDICSETALPHA(indicatorIndex, alpha_value) -
I haven’t checked the Scintilla source code, but I’d be surprised if the code didn’t just ignore the alpha value.
A quick test seems to confirm this.